|
CABRILLO
Historic Structures Report |

|
MATERIAL DESCRIPTIONS, CONDITIONS AND REPAIRS
APPROACH
Our philosophy is that the rehabilitation, restoration, preservation or stabilization of a structure should have a minimal impact on historic fabric. Deficiencies that threaten life and safety, or that are causing deterioration must be corrected. The value of any other improvements should be weighed against the value of the building's integrity. The historic fabric and character-defining features of these structures were described earlier in this report. The following recommendations, extracted from Director's Order 28 (DO-28), Cultural Resource Management Guidelines, apply to all treatments.
Use is monitored and regulated to minimize both immediate and long-term damage.
Use of destructive techniques, such as archeological excavation, is limited to providing sufficient information for research, interpretation, and management needs.
All work that may affect resources is evaluated by an historical architect and other professionals, as appropriate.
All modification, repair, or replacement of materials and features is preceded by sufficient study and recording to protect research and interpretive values.
New work, materials, and replacement features are identified, documented, or permanently marked in an unobtrusive manner to distinguish them from original work, materials, and features. The manner and location of identification is recorded using the Inventory and Condition Assessment Program (ICAP). The ICAP program will be updated and modernized in FY2000, and may become known under a different acronym.
A proposed treatment project is initiated by the appropriate programming document, including a scope of work and cost estimate from an HSR or ICAP. Such projects include preservation maintenance as well as major treatment. No treatment is undertaken without an approved HSR or work procedure documenting the work, and Section 106 compliance.
A treatment project is directed by an historical architect and performed by qualified technicians.
Representative features salvaged from an historic structure are accessioned and cataloged, provided that they fall within the park's scope of collection statement.
All changes made during treatment are graphically documented with drawings and photographs. Records of treatment are managed as archival materials by a curator or archivist within the park's museum collection.
As with any historic building, the State Historical Building Code and the Uniform Code for Building Conservation should be used as the prevailing codes. This allows for sensitive, performance-based means for achieving a safe, improved structure.
|

|
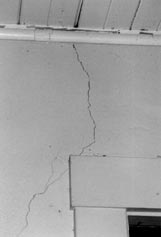
| Figure 31. Concrete cracks at Army Radio Station headers. | Figure 32. Concrete cracks at Base of Battery Calef & Wilkeson Base-End Station hatch. |
REPAIR PROCEDURES
Prior to implementing any repair program, the cause of the problem must be thoroughly identified and understood. Our recommendations therefore begin with survey and diagnoses. This approach will assure that causes as well as symptoms are addressed, and that the problems are less likely to recur. Refer to the Material Matrix located in the Appendix for information on material existing at each structure. Refer to the Ultimate Treatments section, below, for structure-specific recommendations.
Concrete
Description
The majority of the structures surveyed are of reinforced, cast-in-place concrete construction. Finishes on these structures vary, and include the following:
Smooth finish, no visible formwork lines. Examples: Army Radio Station
Smooth finish, visible formwork lines. Examples: Battery Commander and Base-End Station for Battery Ashburn, Searchlight Shelters No. 18 and No. 19
Camouflage finishes, scored or left rough, often with stones embedded into the concrete during the curing process. This finish is common to bunker roofs. Examples: Base-End Station, Batteries Woodward and Grant, Battery Commander Station, Battery Humphreys, Battery Commander and Base-End Station, Battery Ashburn.
Smooth-finished structures are typically painted, while the camouflage-finished surfaces are unfinished. Camouflage roof surfaces typically have a soil-and-vegetation cover.
Some of the concrete may have inherent characteristics that promote deterioration. Many of the structures were constructed quickly, which could result in flaws in workmanship. A large number of structures appear to have inadequate depth of concrete covering the steel reinforcing, leading to corrosion jacking, the expansion of steel reinforcing rod as it rusts. The common use of very large aggregate, especially at the surface, promotes concrete deterioration: aggregate stones get dislodged, creating recesses that collect water. In addition, inherent flaws in the mix can cause long-term problems. Laboratory testing will be essential in determining the concrete's chemical and physical properties.

|
|
|
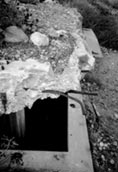
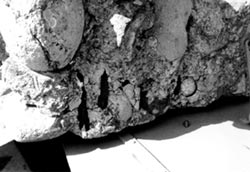
| Figure 33. Spalled concrete at Searchlight Shelter No. 15. | Figure 34. Missing corner and exposed reinforcing rod at lower Billy Goat Point Base-End Station. | Figure 35. Exposed reinforcing rod and post spalls at Calef & Wilkeson. |
Conditions
Cracks
Cracks are a common condition in concrete. The cracks at Cabrillo vary in depth, width, and direction. Causes of these cracks may be equally varied, and may include curing-induced shrinkage, seismic movement, structural overload, differential settlement, thermal stresses, and corrosion jacking. Cracks may be active or dormant; dormant hairline cracks may not require repair.
The Army Radio Station, Searchlight Station No. 18, and the Generator Station have cracks common at reentrant corners, and window and door headers; while the base-end stations have cracks around rough-tooled areas at the connections of roofs with shutters. Curing-induced cracks typically occur at rough-tooled or stone-embedded camouflage concrete: variation in mass during curing causes cracking. Once this occurs, water infiltration is more likely, creating additional problems.
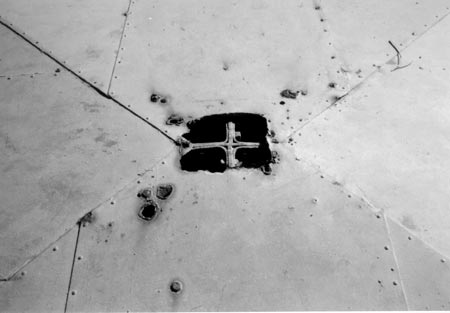
Spalls
Spalls are loss of surface material in patches of varying size. Often, reinforcing rods are visible and are the primary cause of the failure. As reinforcing rods corrode, they expand, creating high stresses within the concrete. Surrounding concrete will then become loose and eventually fall off. Incipient spalls are portions of loose concrete that have not yet detached from the building. Indicative signs of spalls or potential spalls are missing material, visible cracks around the edges of a spall, and concrete that bulges beyond the wall plane.
Headers and sills show extensive spalling, often a result of reinforcing steel placed too close to the surface. Critical spalls occur at the header at Battery Commander and Base-End Station, Battery Ashburn. Impact spalls occur at exposed corners at the Army Radio Station. Impact spalls, possibly from an explosive device, were noted at the interior of the Generator Station.
Erosion
Concrete erosion is the weathering of a concrete surface by wind, rain, and salt air or spray. Most of the Cabrillo structures appear to be undergoing this process, particularly where water is not allowed to drain or where paint finishes are absent or worn away.
Stains
Two types of stains were observed on the Cabrillo structures: corrosion and efflorescence. Corroded reinforcing rod and ferrous metal attachments, including shutters and hardware, have caused corrosion staining at almost all structures. The stains occur below or adjacent to exposed metal. Efflorescence, a powdery white surface stain, was also observed on many structures. Efflorescence is often produced by the leaching of lime from Portland cement, or by the pre-World War II practice of adding lime to the mix to whiten the concrete.
Failed Coatings
Flaking and loss of adhesion characterize failed paint coatings. This is a common condition on many of the painted concrete surfaces. The coatings protect the concrete surfaces from eroding, and are also important in retaining the historic appearance of many of the structures. Common colors here include gray and drab green, allowing the structures to blend in with their environment (refer to Paint, below, for more information).
Recommendations
In general, repairs should duplicate, as closely as possible the original construction to assure that the repair is physically and aesthetically compatible with the existing material. For example, formwork lines, where visible in the existing wall, should be duplicated in the repair. This will require imprinting lumber marks on fresh concrete patches and avoiding the use of plywood formwork. Other original surface textures, such as rough camouflage finishes, should be duplicated as closely as possible in the repair. Of course, original details and mix components that may have had deleterious effects should be avoided. The concrete analysis tests will determine the appropriateness of the original concrete mix.
General Concrete Repair Methodology:
Begin with a field survey to identify and locate all problems. Map cracks, spalls, stains and other conditions on elevation, floor plan and roof plan drawings.
Conduct in-situ tests as appropriate. These include sounding the concrete to identify voids and loose material; using a calibrated metal detector to locate the position, depth and direction of reinforcing bar; and using moisture meters to identify water infiltration and migration patterns.
Collect samples for laboratory tests. Recommended tests include petrographic analysis, strength tests, and chemical tests for chlorides and other components. Laboratory testing is essential not only to determine the characteristics and composition of the original concrete mix formulations, but also in identifying the nature and underlying causes of many of the observed problems.
On structures where repair work is not immediately scheduled, monitor the deficiencies. For instance, apply calibrated crack monitors to selected cracks to gauge their activity level.
Make sure any patch material is physically and visually compatible with surrounding existing material. Repair material should match the composition of the original material as closely as possible.
Concrete Stabilization
The following recommendations are appropriate for structures with designated ultimate treatments of stabilization, preservation, restoration and rehabilitation. For restoration treatments, additional work may be required to return the structure to its appearance during the period of significance.
Cracks
Remove any loose material. Test with wooden mallet to identify loose or unstable areas.
Repair cracks less than 1/16 inches wide with a mix of cement and water.
Repair cracks greater than 1/16 inches with a mixture of cement, sand and water. Field test crack prior to patching to determine whether the crack should be routed (widened and deepened) minimally prior to patching. Patch material must be compatible with surrounding material as determined in laboratory tests described above.
Apply coating to match existing or as determined by paint analysis (see below). Coating must be vapor permeable to avoid trapping moisture within walls.
Spalls
Remove loose material.
Clean corrosion from rusted reinforcing rod by wire brushing or other approved method. Immediately apply an epoxy coating to the clean reinforcing rod to discourage future corrosion. Severely corroded reinforcing rod may need to be supplemented with or, if determined non-essential by a structural engineer, removed entirely.
Prepare area to be patched by roughening the surface with a hammer or chisel. Wet area to be patched, and keep moist for at least one hour prior to patching.
Encourage bond between patch and substrate by scrubbing substrate with cement paste, or by applying a liquid bonding agent.
Patch the area with approved compatible material, matching the original in strength, aggregate, color, and texture. Match surface to surrounding texture.
For structures that were originally painted, coat with vapor permeable paint matched to original paint color. If original color is unknown, match existing, leaving earlier paint layers intact.
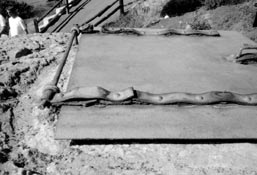
Camouflage Roof Repairs
Survey location and size of voids.
Locate compatible stones to fill voids.
Clean voids of dust or debris.
Clean any exposed rusted reinforcing rod and coat with rust inhibitive coating system. Cut out reinforcing rod if not treatable and insert new reinforcing.
Match new concrete mix to existing in strength, aggregate, color, and texture unless testing proves original mix to be unacceptable. Match new surface to surrounding texture.
Install new stones in voids, back-bedding with mortar, and pinning the larger stones with stainless steel pins as determined by structural engineer.
Concrete Erosion
Diagnose cause of erosion and correct if possible. If cause is coursing water, consider installing drip grooves to undersides of overhanging edges.
If erosion is substantial, over one-and-one-half inches of lost surface material, replace lost surface material with a compatible patch as described above.
Apply non-staining, vapor permeable water-repellent to horizontal concrete surfaces.
Stains
Determine type and source of stain. If the stain is ferrous metal corrosion, locate the metal and determine the cause of the corrosion. Staining may be the first clue that reinforcing rod within the wall is corroding. If the stain is efflorescence, determine and eliminate the source of water.
Remove non-historic, non-functional metal attachments. Patch subsequent holes as described above under Spalls. See Ferrous Metals below for recommendations on attachments. Replace functional attachments with non-corrosive attachments, if problem continues to persist.
Remove stain using the gentlest means possible. Test the area first to make sure the base material is not harmed and that significant paint materials are not impacted. Use gentlest cleaning method possible, beginning with water and a bristle brush. Mild detergent or tri-sodium-phosphate solutions should be tried next. Use proprietary chemical cleaners designed for concrete as a last resort only if necessary. Non-liquid products such as "Peel-Away" may be preferred, since they would have fewer environmental impacts.
Failed Coatings
Conduct paint analyses to determine original paint colors and presence of lead-based paint. At this time, original colors are believed to be olive drab and gray-green. Where paint analysis cannot occur, match existing color but do not remove existing paint layers.
Select a breathable coating material such as latex paint to avoid trapping water or water vapor within the concrete walls.
Recommended Tests:
1. In Situ Tests
- Sounding
- Mapping reinforcing rod with calibrated metal detectors
- Moisture meter mapping
2. Laboratory Tests
- Petrographic analysis
- Strength testing
- Chemical analysis
Concrete References:
Coney, William B., A.I.A. Preservation of Historic Concrete: Problems and General Approaches. Preservation Brief No. 15.
Concrete Repair and Restoration. ACI Compilation No. 5. Detroit: American Concrete Institute, 1980. Reprint of Concrete International: Design & Construction. Vol. 2, No. 9 (September 1980)
Condit, Carl W. American Building: Materials and Techniques from the First Colonial Settlements to the Present, Chicago: University of Chicago Press, 1968.
Guide for Evaluation of Concrete Structures Prior to Rehabilitation. ACI Committee 364, ACI 364, 1R-94.
Scott, Gary. Historic Concrete Preservation Problems at Fort Washington, Maryland. APT Vol. X No. 2 1978.
Ferrous Metal
Description
Ferrous metals are those containing iron. They are widely used at Cabrillo National Monument, in a variety of applications. These include the following:
Reinforcing steel. Used as reinforcement for concrete. Examples: all concrete structures.
Hatch covers. Examples: Calef & Wilkeson.
Window shutters. Examples: All base-end and battery commander stations, and underground searchlight stations.
Ladders. Bent reinforcing steel embedded in concrete. Examples: All base-end and battery end stations, and underground searchlight stations.
Searchlight shelter covers. Steel, hipped roof placed on tracks. Examples: Searchlight Stations No. 15 and No. 19.
Curved steel roofs covered with concrete and stone with steel anchors for netting. Examples: Battery Commander Station Humphreys, all base-end and battery end stations.
Metal tracks and rails. Tracks opened and closed the searchlight shelter covers. Metal rails on the Panama Mounts positioned guns. Examples: Searchlight No. 15 and No. 19, Battery Point Loma Gun Mount.
Metal-covered wood doors. Examples: Searchlight Shelter No. 18.
Solid metal doors. Examples: Generator Station for Searchlight No. 18 and No. 19.
Vertical steel bars. Examples: Generator Station for Searchlights No. 18 and No. 19.
Four-foot steel pipe filled with concrete. Examples: Part of the transit system near Battery Bluff Gun Emplacements.
Galvanized corrugated iron barrel vault. Examples: Battery Point Loma Bunker Complex.
Pipe railing. Used for handrails. Examples: Base-End Station Battery Ashburn,
Piping and conduit. Examples: Most structures.
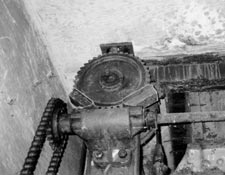
Counter-weighted elevator mechanism with chain sprocket drive. Used to raise the searchlight platform above ground. Examples: Searchlight Shelters No. 15 and No. 19.
|
|
| Figure 36. Coating failure and corrosion at Searchlight Shelter No. 15. | Figure 37. Metal corrosion of hatch at the Battery Commander Station, Battery Humphreys. |
Conditions
Surveyed metals display the following conditions: failed or missing coatings, corrosion, mechanical breakdown, connection failure, and missing elements.
Failed or Missing Coatings
The two primary protective coating types used at Cabrillo are paint and galvanization. Coating loss or deterioration exposes the metal, which begins to oxidize or corrode. Missing or failing coatings were observed on hatch covers, window shutters, searchlight shelter covers, and pipe railings. Consequently, these features display varying stages of corrosion.
Corrosion
When ferrous metal oxidizes, a chemical reaction between the metal and oxygen occurs. Contributing to the deterioration are many of the natural salts, including those found in mud, marine plants and salt water, common to the coastal environment. These salts include halides such as fluorides, chlorides, bromides, and iodides, and are a major cause of metal corrosion. When corrosion occurs, the metal begins to break down and return to its natural ore state. In addition, corroding metal expands. In the case of corroding reinforcing rod, this expansion leads to the spalling of adjacent concrete.
Corrosion rates depend not only upon the environment, but also upon material thickness. Thick metal plate, which is typical of the shelter covers, hatch covers and window shutters, may take years to wear through. Deferred maintenance might not appear to cause immediate problems, but in the long run, the metal will eventually corrode away, leaving little or nothing to preserve.
In addition, corrosion products are unsightly. Rust mixed with rainwater washes onto concrete and other surfaces, causing material staining.
Mechanical Breakdown
Metal elements can fail from physical abuse such as abrasion, fatigue, and stress corrosion cracking. Metal piping filled with concrete, as is found at Battery Bluff transit pole, results in mechanical breakdown, in addition to corrosion from moisture build-up in the concrete, when the concrete expands and contracts at different rates than the metal. Protective coatings may also delaminate because of mechanical breakdown.
Connection Failure
Connectors used at Cabrillo include bolts, braces, rivets, pins and welds. Connection failure may result from overloading, fatiguing, and corrosion. Corrosion will also make connectors more susceptible to stress failure, as is the case in some hatch covers.
Missing Elements
Missing metal elements include those which have been misplaced, vandalized, or deliberately removed. These elements include metal shutters, hardware, non-functioning plumbing pipes, flue pipes, etc.
|
| Figure 38. Missing roof vent and metal corrosion at Searchlight Shelter No. 15. |
Recommendations
General Metal Repair Methodology:
Begin with a field survey to identify and locate all problems. This survey can and should be done in conjunction with the survey of other materials. Missing coatings, corrosion, mechanical breakdown, connection failure, missing elements, and other conditions should be mapped on elevation, floor plan and roof plan drawings.
Test metal with a magnet to confirm metal type. Ferrous metal will respond to magnetism, other metals will not.
Determine the degree of failure for the element and the degree of repair required. For example, if a missing coating has caused limited surface corrosion, then only cleaning and replacement of the coating will be necessary. If severe corrosion has worn away sections of pipe railing, then patching or full replacement may be required.
On structures where repair work is not immediately scheduled, mark, cover, or rope off dangerous areas to prevent risk to visitors or park staff.
Make sure any new metal is physically and visually compatible with surrounding existing metal. Repair material should match the original metal type, composition, dimension, surface texture and coating appearance.
Ferrous Metal Stabilization
The following recommendations are appropriate for structures with designated ultimate treatments of stabilization, preservation, restoration and rehabilitation. For restoration treatments, additional work may be required to return the structure to its appearance during the period of significance.
Missing Coatings and Corrosion
See Concrete, above, for more about reinforcing rod. See Paint, below, for more about paint analysis and coating selection.
Before removing any paint, conduct paint analysis to determine the historic paint sequencing and presence of lead-based paint (see Paint, below).
Remove rust and most of the surrounding paint. Determine the extent of failure, corrosion and surface detailing before determining the removal method. Potential methods include wire brushing, grit blasting, flame cleaning, or chemical methods. Grit blasting in inappropriate for in situ cleaning at Cabrillo National Monument, but may be appropriate for elements which may be removed for off-site treatment. The presence of lead-based paint will also affect the choice of removal method (refer to the Paint section for recommendations).
Remove all loose, flaking, and deteriorated paint and corrosion to bare metal.
Degrease surface and prime immediately.
Paint Selection: Option One - Two coats of Alkyd rust-inhibitive primer, followed by alkyd enamel finish coats. Do not use latex or other water-based paints. Option Two - high-performance coatings, such as zinc-rich primers containing zinc dust, and modern epoxy coatings, should be considered to allow for longer-lasting protection. Note: These coatings typically require highly clean surfaces and special application conditions that can be difficult to achieve at some sites. Flashings or new metal may need three primer coats followed by compatible finish coats.
Apply paint. Ensure that all surfaces are dry. Do not paint when temperatures are expected to fall below 50 degrees Fahrenheit within 24 hours or when relative humidity is above 80 percent. Brush apply or use an airless sprayer, being careful to protect adjacent surfaces and landscape from overspray. Do not use rollers for primer coat applications.
Connection Failure
Repair failed attachments at hatches, doors, or shutters by tightening or replacing connectors. Match connector size and type, using stainless steel connectors if possible to avoid future corrosion. Avoid combining dissimilar metals, such as copper and steel. Repair failed riveted connections by spot-welding.
Severe Deterioration and Mechanical Breakdown
Severely deteriorated metal: cut out the failed metal and replace with new castings spliced in place by welding or brazing. Use an epoxy-patching compound designed for ferrous metal repairs to patch small voids.
Where concrete infill has resulted in mechanical breakdown or corrosion, take apart if possible and remove concrete. Clean away rust, prime the interior, paint elements, and reassemble. If the element is severely deteriorated, replicate the piece with new material.
Missing Elements
Locate any elements that may have been put in storage or placed nearby and reattach to structure.
Duplicate and attach elements that are missing, such as window shutters. For small elements, such as hardware, these can be used as casting patterns. For large elements, create patterns made slightly larger in size to compensate for 1/8 inches per foot shrinkage during casting.
Coat the replaced metal element following the paint procedure described in Missing Coatings and Corrosion.
Substitute materials, including aluminum and zinc castings, should be considered only as a last resort. These materials may have different expansion and contraction coefficients, and may require different future care than the original iron and steel products.
Recommended Tests
- Paint Analysis. See Paint, below.
- In situ magnetic analysis.
Ferrous Metal References:
Look, David, Margot Gayle, and John Waite. Metals in America's Historic Buildings. U.S. Department of the Interior, National Park Service Cultural Resources, Preservation Assistance, Washington, D.C., 1992.
Ashurst, John, and Nicola Ashurst with Geoff Wallis and Dennis Toner. Practical Building Conservation: English Heritage Technical Handbook; Volume 4 Metals. Aldershot, Hants: Gower Technical Press, 1988.
Park, Sharon C., A.I.A. Preservation Briefs 16: The Use of Substitute Materials on Historic Building Exteriors. Washington D.C.: Preservation Assistance Division, National park Service, U.S. Department of the Interior, 1988.
Wood elements
Description
Wood is not used extensively at Cabrillo National Monument, although it is found on some structures. Various applications include the following:
Wood-framed roof. Examples: Army Radio Station.
Wood doors. Examples: Army Radio Station.,
Metal-clad wood doors and frames. (See Ferrous Metal Section)
Wood windows. Examples: Generator Station for Searchlight No. 18 and No. 19, Army Radio Station.
Wood curb at searchlight shelter roofs. Examples: Searchlight Shelters No. 15 & No. 18
Wood furniture. Cabinets, shelves, and benches constructed for use in structures. Examples: Searchlight Shelter No. 15 and No. 19, Base-End Station Calef & Wilkeson, and Base-End Station Woodward & Grant, and bunk beds at Battery Point Loma Bunker Complex.
Trim. Wood trim used around doors, windows, etc. Examples: Army Radio Station.
|
| Figure 39. Deteriorated wood curb at Searchlight Shelter No. 15. |
Conditions
Weathered Wood, Dry Rot, and Splitting
Wood is vulnerable to biological decay from exposure to moisture. Rapid cycles of wet and dry conditions in poorly protected wood causes cracking and checking that will lead to further decay. Searchlight Shelters No. 15 and No. 19 exhibit this condition at the wooden curbs surrounding the metal roofs. The unpainted curbs are exposed to salt spray and ocean winds, resulting in checking and dry rot as well as detachment.
Missing Elements
Missing wood elements are typically small trim pieces. Although these losses are non-structural, they are an architectural concern. Wood may become detached because deterioration or checking has weakened mechanical fastenings, or through theft or vandalism. Wood elements are easy to detach and if not reattached immediately will be lost.
Missing Paint
Unprotected wood can decay if left exposed. Blistering and peeling paint are the first signs that the structure is in need of maintenance. See Paint section, below, for more information.
Insect Damage
Although no insect damage was observed during the survey leading to this report, insect inspections should be a regular feature of periodic maintenance. These inspections would identify any ongoing attacks before they became serious. Insects causing damage to wood include beetles, ants, bees, wasps, and termites. It is important to identify the attacking insect. Relevant information includes type of wood attacked, the age of the wood, the type of damage, and the consistency of the boring dust.
Recommendations
Research original documents to determine whether wood elements were originally painted. Conduct a paint study to determine color schemes. Since the concrete structures appear to have been originally painted, it is likely that wood elements were likewise painted.
General Wood Repair Methodology:
Survey the existing condition of all wood elements.
Sample woods and send to a laboratory for identification. (The U.C. Forest Products Laboratory in Richmond, California, performs this service. )
Remove all dirt, debris and miscellaneous attachments.
Remove any finishes if loose, blistering or peeling.
Treat wood elements selectively with fungicide and brush-on consolidant as required.
Replace-in-kind or consolidate deteriorated wood elements as required.
Treat with wood preservative and finish to match adjacent material.
Wood Windows
In addition to items 1-6 under General Wood Repair Methodology, above, perform the following:
Restore window to proper operation.
Install new hardware, where missing, to match original.
Install new glazing where cracked or missing.
Replace glazing compound.
Prepare wood surfaces, prime, and paint.
Wood Doors
In addition to items 1-6 under General Wood Repair Methodology, above, perform the following:
Repair splits and separations with waterproof glue as required.
Finish to match adjacent, if any, or finish to match original.
Recondition hardware, and install new hardware, where missing, to match original.
Recommended Tests
- Wood identification.
- Paint analysis (see Paint, below).
Wood References:
Myers, John H. Preservation Briefs No. 9: The Repair of Historic Wooden Windows. Washington D.C.: Preservation Assistance Division, National Park Service, U.S. Department of the Interior, 1981.
Look, David W. Preservation Briefs No. 10: Paint Removal from Historic Woodwork. Washington D.C.: Technical Preservation Services, U.S. Department of the Interior. 1982.
Ashurst, John, and Nicola Ashurst with Geoff Wallis and Dennis Toner. Practical Building Conservation: English Heritage Technical Handbook; Volume 5 Wood, Glass & Resins. Aldershot, Hants: Gower Technical Press, 1988.
Bituminous Roofing
Description
The flat roof at the Army Radio Station is covered with composition roll roofing. Roll roofing is a type of built-up roofing that consists of paper or felt saturated with tar, asphalt, or other waterproofing compounds. The material is rolled out parallel to the eaves and lapped one or two inches over the course next to it. Roll roofing is not long lasting and tends to buckle, but it is a quick, inexpensive method of covering structures.
Condition
The composition roll roofing material on the Radio Station was recently replaced. In February of 1999, the old roll roofing was removed, the wood decking beneath was surveyed, new bituminous roll roof was applied, and the seams were sealed.
Recommendations
Survey the roof annually for buckling and leaks, especially at seams, penetrations, and at the edges. Properly applied, this material should have a life expectance of five to ten years.
Grade and Vegetation Issues
Description
Many of the Cabrillo structures are constructed underground, partially underground, or were historically topped with a camouflage of earth and vegetation. As a result, three conditions occur: hydrostatic pressure, erosion and subsidence, and excessive or out-of-control vegetation.
Hydrostatic pressure build-up. Examples: Army Radio Station and all underground or partially underground structures.
Subsidence. Examples: Battery Bluff North and South Gun Placements.
Excessive Vegetation: Examples: All structures with camouflage roofs.
Conditions
Hydrostatic Pressure
Hydrostatic pressure is lateral pressure exerted by water-saturated soils on an underground or partially underground structure. This condition may cause structural deformation as well as water infiltration.
Water Infiltration
Water infiltration from either standing water or hydrostatic pressure can create moisture-related problems within walls (such as reinforcing rod corrosion), as well as moisture problems at the interiors of the structures.
Subsidence and Erosion
Subsidence refers to the settling or collapse of unstable terrain. Battery Bluff is subsiding and falling into the water below. If this condition is allowed to continue, the Battery Bluff Gun Placements will be lost. Erosion refers to the gradual washing away of loose soils.
Excessive Vegetation
Excessive or out of control vegetation can cause damage from invasive roots and by holding moisture against building materials.
Recommendations
Hydrostatic pressure and moisture penetration can only be completely alleviated by digging around foundations and applying watertight membranes at the exterior of the structures. This is a costly and invasive solution and is recommended only as a last resort. Observing hillside drainage above and around the structures may provide mitigation. Create swales as required to divert water away from structures.
Subsidence: Consult a soils engineer to determine the extent and rate of subsidence. The soils engineer may establish a monitoring program, and recommend mitigation procedures. These procedures should be reviewed by a park ecologist. Structures in danger of loss from subsidence should be thoroughly documented.
Erosion: Clear away all loose soil and restore pathways around the structures.
Monitor the vegetation surrounding the structures. If the vegetation becomes invasive and destructive to the concrete roofs or other adjacent material, survey the plant types, remove the vegetation, repair the roof system, and determine if, and to what degree the vegetation should be replanted. As part of the repairs, provide a watertight membrane at the concrete surface before replacing the earth and vegetation.
Recommended Tests
- Hire a soils engineer to study subsidence conditions.
Grade and Vegetation References:
Scott, Gary. Historic Concrete Preservation Problems at Fort Washington, Maryland. APT Vol. X No. 2, 1978.
Weaver, Martin and Frank Matero. Conserving Buildings: Guide to Techniques and Materials. Chapter 12, Foundations and Footings. John Wiley & Sons, Inc., New York, 1993.
Paint
Description
Paint is used to protect substrate material as well as to add color for aesthetic or otherwise functional reasons. Many structures at Cabrillo use paint as a means of camouflage. The painted surfaces at Cabrillo are briefly discussed in the Concrete, Metal, and Wood sections.
Painted concrete. Examples: Searchlight Station 18, Electrical Connection Box, Base End Station Calef & Wilkeson, Base End Station Battery McGrath, Battery Command Station Humphreys, Generator Station for Searchlight Nos. 18 & 19
Painted metal. Examples: All structures.
Painted wood. Examples: Army Radio Station, Searchlight Shelter Nos. 15 & 19, Generator Station for Searchlight No. 18 & 19, Base-End Station Calef & Wilkeson, Base-End Station Woodward & Grant.
Historic paint colors. Examples: Surfaces painted in drab gray and green blended the structures with their surroundings. Most structures had paint of a specific color.
Conditions
Paint Deterioration
In addition to being unstable, deteriorated paint can accelerate the deterioration of the substrate.
Lead-based Paint Health Hazards
Lead-based paint that has flaked or been detached from a structure is a health hazard if inhaled or ingested, especially for small children. Lead-based paint was used widely in interiors and exteriors up until 1978, when it was partly banned by the federal government. Many of the metal surfaces at Cabrillo were given a primer of lead-based paint by the NPS in 1980.
Recommendations
Research original documents to determine what elements were painted and the type of paint used. A general maintenance plan should be created to include inspection of painted surfaces. The life span of paint can be anywhere from five to ten years, depending upon the type of paint, the application method, and the environment where the structure is located.
Survey structures to locate painted surfaces and condition of those surfaces. Locate and protect areas having significant graffiti.
Hire a hazardous material consultant to locate and test areas incorporating lead paint.
Conduct paint analysis to determine original paint materials and color schemes.
Paint Deterioration
Maintain painted surfaces to protect substrates. Refer to specific material sections for repair recommendations.
Lead-based Paint
Follow the Secretary of the Interior's Standards for the Treatment of Historic Properties. These guidelines will prevent extensive loss or modification of architectural features and finishes on historic properties. Lead-based paint that is not causing a hazard is permitted to remain at a site, therefore retaining important features.
Undertake a risk assessment of interior and exterior surfaces to determine the hazards from lead and lead-based paint.
Evaluate the options for lead hazard control in the context of historic preservation standards. Encapsulation is often an acceptable option for sound lead paint surfaces. The mitigation plan should be reviewed by a preservation architect.
Follow all worker safety standards, OSHA 29 CFR Part 1926, Lead Exposure in Construction; Interim Final Rule. Worker safety can include the following issues: respirator use, monitoring blood and dust levels, and protective equipment. Lead abatement work should always be performed by trained abatement technicians.
Compliance. Comply with all federal, state and local laws regarding lead-based paint abatement, environmental controls and worker safety. Dispose of all hazardous waste according to applicable laws. Some removal methods can generate lead-contaminated dust, which can be dangerous to workers and residents.
Historic Colors
Have a conservator or paint specialist conduct a paint color analysis for all structures to determine original color schemes and paint types. Match colors to the Munsell Color Notation System or other color standard.
Maintain buildings and building elements by painting with recommended paint color.
Prior to any building repairs, make sure the historic colors are fully documented before any removal is conducted. If paint stripping is to occur, if possible leave an in situ area of historic paint layers intact as documentation for future researchers.
Recommended Tests:
- Paint Analysis
- Lead tests
Paint References:
Batcheldor, Penelope Hartshorne. Paint Color Research and Restoration. Technical Leaflet 15. Nashville: American Association for State and Local History (undated).
Park, Sharon C., and Douglas C. Hicks. Preservation Brief No. 37: Appropriate Methods for Reducing Lead-Paint Hazards in Historic Housing. Washington D.C., U.S. Department of the Interior National Park Service Cultural Resources, Preservation Division, 1995.
"Coping with Contamination: A Primer for Preservationists". Information Booklet No. 70. Washington D.C.: National Trust for Historic Preservation, 1993.
OSHA Lead in Construction Standard (29 CFR 1926.62), Occupational Safety and Health Administration, May 4, 1993 (Federal Register).
Park, Sharon C. "Lead-Based Paint in Historic Buildings," CRM Bulletin. Washington, D.C.: U.S. Department of the Interior, National Park Service. Vol. 13, No. 1, 1990.
Park, Sharon C. "What to do about Lead-Based Paint," CRM Bulletin. Washington, D.C.: U.S. Department of the Interior, National Park Service. Vol. 17, No. 4, 1994.
Graffiti
Description
Graffiti refers to non-original surface markings. Common media include chalk, ink, pencil, spray paint, and felt-tip pen. Many of the bunker interiors along the Bayside Trail have serious graffiti problems. Some structures also feature painted or penciled markings from the period of significance. These marks may have aided in the use of the structures.
Graffiti. Examples: Lower Base-End Station at Billy Goat Point, Base End Station Battery McGrath.
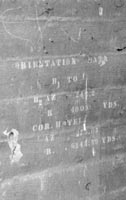
Historic Graffiti. Examples: Markings at the Battery-End and Base-End Stations, Calef & Wilkeson, which presumably marked orientation data.
|
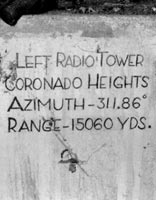
|

|
| Figure 40. Transit graffiti at the Base-End Station, Batteries Calef & Wilkeson. | Figure 41. Transit graffiti at the Battery Commander Station, Battery Humphreys. | Figure 42. Graffiti on corrugated metal at Battery Point Loma Bunker Complex. |
Recommendations
Conduct a survey to locate and determine the extent of graffiti. Retain and preserve significant graffiti.
Remove non-historic graffiti using the gentlest means possible. Test the area first to make sure the substrate is not harmed and that significant paint surfaces are not removed. Begin with tri-sodium-phosphate and water and then try other chemical removers if necessary.
| <<< Previous | <<< Contents >>> | Next >>> |
cabr/hsr/material-descriptions.htm
Last Updated: 06-Apr-2005