|
Cowpens National Battlefield South Carolina |
|
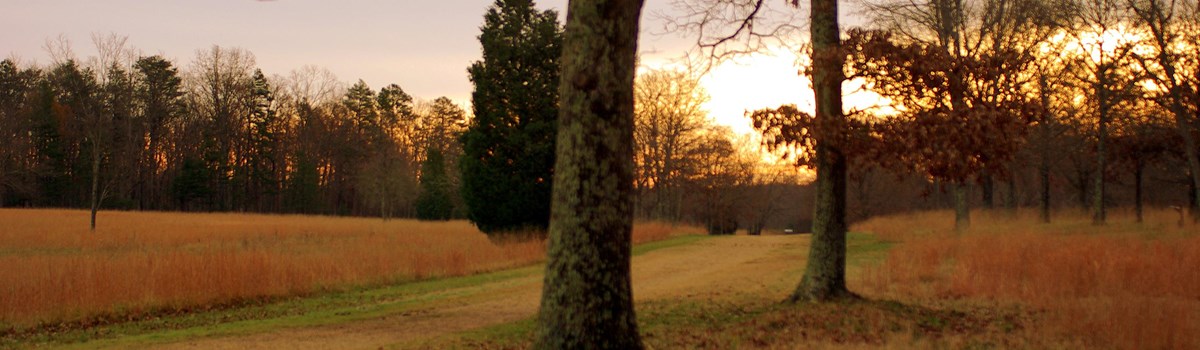 NPS photo | |
On this field on January 17, 1781, Daniel Morgan led his army of tough Continentals and backwoods militia to a brilliant victory over Banastre Tarleton's large force of British regulars. When he marched his army onto this field the previous afternoon, Morgan was trying to elude a British trap. That morning, as his men cooked breakfast in camp on Thicketty Creek, scouts brought news that Tarleton had crossed the Pacolet River, 12 miles south, and was coming fast. Morgan broke camp immediately and ordered his soldiers down the road. Their destination: the Cow Pens, a frontier pasturing ground on the road to a ford across the Broad River six miles to the northwest. Morgan was in a precarious position. If he crossed the river, most of his militia would probably desert him. If Tarleton caught the Americans on the road or the river, they could all be cut down. Morgan chose to stand and fight.
Who was Daniel Morgan, this tactical genius behind the victory at Cow Pens? Before age 20 he was hauling freight on poorly defined roads over Virginia's mountains. In the French and Indian War (1754-1763) he served as a teamster in the British army and accompanied Gen. Edward Braddock's ill-fated 1755 expedition against Fort Duquesne. In 1756 he hit a British officer and was sentenced to 500 lashes with a cat-o'-nine tails, a punishment that had killed lesser men. (He later claimed the British still owed him one lash.)
When the Revolutionary War began, he led a unit of Virginia sharpshooters to Boston, where they joined the Continental Army and, in the winter of 1775, took part in an abortive attack on Quebec. Captured and exchanged, Morgan recruited another unit of Virginia sharpshooters and joined Maj. Gen. Horatio Gates' army in a decisive role in winning battles at Saratoga on September 19 and October 7, 1777. In July 1779, passed over for promotion, he left the army and returned to Virginia.
In September 1780 Morgan rejoined the army after Gates, who had been given command of Continental forces in the South, suffered a defeat at Camden, S.C. Promoted to brigadier general, Morgan was commanding a corps of light troops when Maj. Gen. Nathanael Greene replaced Gates in early December and set about recovering American military fortunes. Greene's strategy was to divide his army and force the British to split theirs. He sent Morgan with a detachment called the "Flying Army" into western South Carolina to operate on the British left flank and rear, threatening their outposts and giving "protection to that part of the country and to spirit up the people."
To remove the threat of Morgan's presence, Maj. Gen. Charles Cornwallis, British commander in the South, sent Banastre Tarleton with the British Legion and some of his best light troops. The British Legion was known for its brutality in cutting down unarmed or fleeing soldiers. Tarleton was widely hated in South Carolina after his troops butchered Col. Abraham Buford's surrendered Continentals at Waxhaws in May 1780. When Cornwallis sent Tarleton after Morgan, he set the stage for a confrontation between two of the War's most colorful commanders.
Morgan knew that Tarleton's force outnumbered his own. To even the odds, he sent for militia units from South Carolina, North Carolina, and Georgia—men who had fought at Musgrove Mill, Kings Mountain, Kettle Creek, and Williamson's Plantation, and who had fought to protect their homes in hand-to-hand combat with Indians. These were men of courage and experience, but Morgan knew they were no match for British battle tactics. Their rifles could not mount a bayonet, making them defenseless against a bayonet attack or a mounted charge by dragoons. The militia's strength lay in its prowess with rifles—weapons with greater range and, in their hands, deadlier and more accurate than British muskets. Morgan, keeping this in mind, devised a battle to match the strengths of his men and the terrain.
Morgan chose to fight in an open wood on ground that sloped gently southeast, the direction from which the British would approach. The field had three low crests separated by wide swales. The road, later called Green River Road, curved through the area. Morgan formed his troops in three lines straddling the road. In the front line, sharpshooters stood in small groups. Their job was to slow Tarleton's advance with well-aimed fire, then fall back. The second line, 90 yards behind the sharpshooters, included Andrew Pickens' regional militia. Morgan asked them for two volleys at a "killing distance," then they were to fall behind the Continentals. In the third line, 150 yards behind Pickens and stretching along the forward crest, were John Eager Howard's 600 crack Maryland and Delaware Continentals and veteran Virginia militia. Behind that crest, Morgan stationed 150 cavalrymen under command of William Washington, with orders to protect the militia and be ready to fight.
Just before dawn the British came into full view of the American front line. Tarleton sent cavalry to drive back the American sharpshooters, then he formed and advanced his line of battle—infantry astride the road; on each flank, 50 dragoons; in reserve, a brigade of Highlanders and 200 cavalry. As the British came within range Pickens' militia line fired, dropping two-thirds of the British officers, then withdrew behind the Continental line. The British dragoons on the right pursued the militia but were driven back in a fierce charge by Washington's cavalry.
The British surged onto Howard's line, the fighting pitched. Highlanders threatened to outflank the American right. Then a confused tangle of events brought the fighting to a dramatic conclusion. Howard ordered his right flank to fall back and form a new front, but his order was misinterpreted—and the entire line began to retreat.
Seeing this Morgan rode up and chose new ground where the Continentals could rally. Reaching that point, the men faced about and fired point-blank at the closing redcoats, then plunged into the staggered ranks with bayonets. As this was happening, Washington's cavalry rode into the swirling fight—while on the British left, Pickens' militia opened a galling fire on the dragoons and Highlanders. British resistance quickly collapsed. A few dragoons rallied to Tarleton, but they were ineffective and followed the British Legion cavalry, which never joined the fight, in a pell-mell dash off the field.
The battle was over in less than an hour. British losses: 110 killed, 229 wounded, and 600 captured or missing. Also captured with the British were a number of slaves. Morgan's losses: 24 killed and 104 wounded. The "Old Waggoner's" unorthodox tactical masterpiece had "spirited up the people," not just those of the backcountry Carolinas but in all the colonies. As Morgan later told a friend, he had given Tarleton and the British a "devil of a whipping."
The Southern Campaign, 1778-1781
New Hope for the American Revolution
By the time the Battle of Cowpens was fought, the lower South had become the decisive theater of the Revolutionary War. After the struggle settled into stalemate in the north, the British mounted their second campaign to conquer the region. British expeditionary forces captured Savannah in late 1778 and Charleston in May 1780. By late that summer, most of South Carolina was pacified, and a powerful British army under Lord Cornwallis was poised to sweep across the Carolinas into Virginia. The campaign opened at Charleston in August 1780, when Cornwallis marched north to confront Horatio Gates at Camden. It ended at Yorktown in October 1781 with Cornwallis' surrender of the main British army in America. In between were months of some of the hardest campaigning and most savage fighting of the war.
Chain of Command
The Commanders
Morgan was a frontiersman, a teamster by trade, experienced at fighting Indians, and a genius at leading men in battle. When at age 45 he took command of Nathanael Greene's light troops in 1780, he was well-known for his military abilities, having fought with distinction at Quebec in 1775 and at Saratoga in 1777. After Morgan left the army in February 1781 due to illness, Greene remarked: "Great generals are scarce—there are few Morgans to be found."
Tarleton had a reputation as being ruthless and fearless in battle. An offspring of British gentry, he purchased his commission in the British Army, and at 21 became an officer of dragoons. He volunteered to fight in America, serving with distinction in the North. In his mid-20s Tarleton became commander of the British Legion, a mobile force of cavalry and infantry. American propagandists vilified him. Decades after the war American writers called him "Bloody Tarleton."
Morgan's Army
Militia
Morgan's militia were tough and experienced. Some 200 were
ex-Continentals from Virginia under Maj. Francis Tripleft. Others were
recruits from Georgia and the Carolinas commanded by the wily partisan
Col. Andrew Pickens. Morgan knew their worth and deployed them to make
the most of their strengths and minimize their weaknesses. They rewarded
him with a victory still marveled at over 200 years later.
Continentals
Lt. Col. John Eager Howard's battalion of Maryland and Delaware
Continentals fought courageously at Cowpens and afterwards. Nathanael
Greene called Howard "as good an officer as the world affords." The
Maryland unit was one of the few regiments to fight in both the Northern
and Southern campaigns. By war's end the Delaware Continentals were
considered one of the elite light infantry units of the Southern
Army.
Cavalry
Few officers saw more combat than Lt. Col. William Washington, a second
cousin of George Washington, the commanding general. A veteran of many
battles and skirmishes, he and his Third Continental Dragoons were the
main reserve at Cowpens. Hidden by terrain behind the Continental line,
they were close enough "as to be able to charge the enemy, should they
be broken."
Tarleton's Army
  (click for larger maps) |
Legion Cavalry
This green-uniformed unit was the mounted arm of Tarleton's British
legion. At Cowpens, it was a mixture of loyalists and American prisoners
of war from Camden, S.C., armed with sabers, pistols—and
attitude.
16th Light Infantry
This detachment from the 16th Regiment of Foot was composed of men
selected for their agility and endurance. These were crack troops, most
of whom had been fighting in America since the war began.
7th Royal Fusiliers
Although drawn from the 7th Regiment of Foot, one of the oldest
regiments in the British Army, this battalion was composed of untested
new recruits only partially trained.
Royal Artillery
Eighteen royal artillerymen were responsible for the two light cannon
that accompanied Tarleton's force. These guns, which may have been
captured from the patriots at the Battle of Camden, helped boost
Tarleton's confidence in confronting Morgan at Cowpens.
71st Highlanders
Known as Fraser's Highlanders, this elite regiment was raised for duty
in America and saw extensive service in the Northern Theater before
being transferred to the South in 1780. The regiment fought valiantly at
the Siege of Savannah and in later operations in South Carolina.
17th Light Dragoons
The excellence of this regiment made it the first cavalry corps selected
for service in America in 1775. Detachments were present in most of the
important engagements throughout the war. The men were a model of
discipline for other cavalry troops raised by the British in America
during the war.
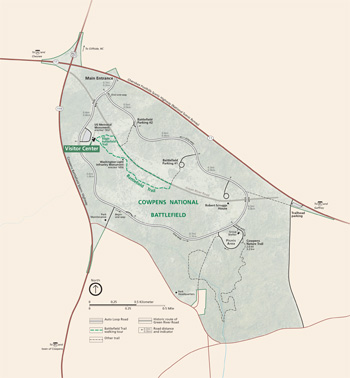
Getting Around Cowpens Battlefield
Cowpens National Battlefield is open daily from dawn to dusk. Visitor center parking is available from 9 am to 5 pm. Before or after these hours use the Trailhead parking lot one mile east of the main gate.
Visitor Center Start here for information, exhibits, and a bookstore. You can see a fiber-optic map, a film "Cowpens: A Battle Remembered," and a museum with authentic Revolutionary War weapons. Open daily except Thanksgiving, December 25, and January 1.
Auto Loop Road The three-mile loop around the perimeter of the battlefield features wayside exhibits, overlooks with short trails to the battlefield, and access to the Robert Scruggs House, an early 1800s log cabin. Note: The auto loop road and picnic area close at 4:30 pm.
Battlefield Trail A 1.25-mile self-guiding battlefield tour begins and ends at the visitor center. The trail includes the Green River Road along which the battle was fought. It is one of the few portions of the original road that still exists.
Regulations and Safety Tips
• Use caution when driving the loop road. Watch for pedestrians and
bicyclists.
• Bicycles are allowed on the loop road and parking areas only.
Bicyclists must wear helmets, travel in the same direction as traffic,
and use the bike lane to allow vehicles to pass. There is a bicycle rack
at the visitor center parking lot.
• Pets are not allowed in buildings. They must be attended at all
times and be on leashes no longer than six feet.
• Park and picnic only in designated areas.
• It is a violation of federal law to climb on monuments.
Source: NPS Brochure (2011)
|
Establishment
Cowpens National Battlefield — April 11, 1972 |
For More Information Please Visit The  OFFICIAL NPS WEBSITE |
Documents
A Legacy of Principles and Leadership: Decisive Victory at Cowpens (Brady Dearden, extract from Infantry, Vol. 105 No. 2, April-July 2016)
An Administrative History: Cowpens National Battlefield (HTML edition) (Cameron Binkley and Steven A. Davis, February 2002)
Avifauna inventory of Cowpens National Battlefield 2004-2005 (D. Seriff, May 2006)
Baseline Water Quality Data Inventory and Analysis, Cowpens National Battlefield NPS Technical Report NPS/NRWRD/NRTR-99/211 (March 1999)
Bats of Carl Sandburg Home National Historic Site, Cowpens National Battlefield, Guilford Courthouse National Military Park, Kings Mountain National Military Park, Ninety Six National Historic Site Final Report (Susan Loeb, July 2007)
Cowpens: Official National Park Handbook #135 (1988)
Cowpens Staff Ride and Battlefield Tour (Lieutenant Colonel John Moncure, January 1966)
Foundation Document Overview, Cowpens National Battlefield, South Carolina (October 2014)
Geologic Map of Cowpens National Battlefield, South Carolina (September 2020)
Geologic Resources Inventory, Cowpens National Battlefield NPS Natural Resource Report NPS/NRSS/GRD/NRR-2020/2214 (Trista L. Thornberry-Ehrlich, December 2020)
Historic Grounds and Resource Study, Cowpens National Battlefield, South Carolina (Edwin C. Bearss, July 1974)
Historic Structure Report: Richard Scruggs II House Ruin & Martin Barn Foundation, Robert Scruggs House, Cowpens National Battlefield (WLA Studio and RATIO Architects, November 2018)
Historic Structure Report, Historical Data: Robert Scruggs House, Cowpens National Battlefield Site, South Carolina (Edwin C. Bearss,, November 1974)
Historic Structure Report: Washington Light Infantry Monument, Cowpens National Battlefield (WLA Studio and RATIO Architects, November 2018)
Historical Statements Concerning the Battle of Kings Mountain and the Battle of the Cowpens, South Carolina 70th Congress, 1st Session, House Document No. 328 (1928)
Inventory and Classification of Wetlands at Cowpens National Battlefield, Chesnee, South Carolina (Thomas H. Roberts and Kenneth L. Morgan, December 2006)
Inventory of Fishes in Cowpens National Battlefield (Mark C. Scott, November 30, 2006)
Junior Web Ranger, Cowpens National Battlefield (Date Unknown)
Master Plan and Development Concept Plan, Cowpens National Battlefield (1975)
Master Plan, Cowpens National Battlefield (1981)
National Register of Historic Places Nomination Form
Cowpens National Battlefield (The Cowpens, Cowpens, Hannah's Cowpens, Cowpens Battleground) (Lenard Brown, December 1976)
Natural Resource Condition Assessment for Cowpens National Battlefield NPS Natural Resource Report NPS/COWP/NRR-2012/521 (Luke Worsham, Gary Sundin, Nathan P. Nibbelink, Michael T. Mengak and Gary Grossman, April 2012)
Ozone and Foliar Injury Report for Cumberland Piedmont Network Parks Consisting of Cowpens NB, Fort Donelson NB, Mammoth Cave NP and Shiloh NMP: Annual Report 2009 NPS Natural Resource NPS/CUPN/NRDS-2010/110 (Johnathan Jernigan, Bobby C. Carson and Teresa Leibfried, November 2010)
Results of herpetofaunal surveys of five national park units in North and South Carolina (Robert N. Reed and J. Whitfield Gibbons, September 16, 2005)
Robert Scruggs House Historic Structure Report (Edwin C. Bearss, November 1974)
Terrestrial Mammals of Cowpens National Battlefield Chesnee, South Carolina (Edward Pivorun and Linda Fulton, 2007)
The Battle of Cowpens: A Documented Narrative & Troop Movement Maps (Edwin C. Bearss, October 15, 1967)
Vascular Plant Inventory and Plant Community Classification for Cowpens National Battlefield (Rickie D. White, Jr., NatureServe, May 2004)
cowp/index.htm
Last Updated: 01-Jan-2025