|
Forest Trail Handbook
|
|
SECTION VI.—CONSTRUCTION
17.—SIZE AND ORGANIZATION OF CREWS
Crews composed of 8 or 10 men, including foreman and cook, are the most economical on heavy construction. If work is to be rushed, use two or more separate crews of this size on sections worked from different camps rather than one large crew. On way trails, construction crews of from 2 to 4 men are generally most economical. Exceptions are those cases where a number of radiating trails can be worked from one camp.
Plan to have blacksmithing done by the foreman or the powder men rather than by any other workman.
Work swampers at least 2 days ahead of graders.
See to it that the line designating position of grade is at least 1 day ahead of graders.
Wherever practicable, work graders far enough ahead of rock men so that blasting will not interfere with graders. Assign graders to stations 25 feet, 50 feet, or 100 feet apart. Do not permit them to crowd up.
Work rock men and powder men behind graders. Do not blast stumps ahead of hand graders.
The trimmer men following the crew are to smooth up tread, install water breaks, decrease angle of back slopes where they are too steep, and cut any interfering brush left by the swampers.
The organization can be put into operation only after the job is well started. Entire crews might clear at the outset in order to get 3 or 4 days clearing ahead. Then all but the regular swampers will grade until the grading proceeds a safe distance ahead of the blasting work. After grading is well advanced, rock men and powder men can be assigned their job. In turn, the trimmers can take up their work.
For light work see organization under Maintenance.
18.—CAMPS
Keep camps as near as possible to the work and never more than 1 mile in advance of construction to enable the crew to work both ways from them.
The ordinary sanitary requirements of the Forest Service will be observed in all trail camps.
19.—STANDARDS FOR WAY TRAILS
Way trails will be constructed and maintained entirely for fire control purposes. The objects of way trail construction are:
(a) To prepare as rapidly as possible for the extreme fire emergency.
(b) To provide a system of ways sufficiently intensive to permit any part of a forest being reached to afford adequate protection.
In locating way trails emphasis should be placed on finding the cheapest route that will serve the desired ends. Way trails will not be located with the idea of using the same route for a higher class trail at a later date. Nevertheless, disregarding the principles of determining a location will not be tolerated. A reconnaissance of the country to be traversed should always be made, followed by the clear marking of control points and the placing of marks (blazes, strips of cloth on brush, etc.) at intervisible points to indicate the general line to be followed by the way in connecting the control points.
Stakes should not be set for way trails except on the portions to be graded, and where rock or other obstacles make an exact location necessary.
Clearing for way trails should be of sufficient width to provide for the passage of loaded pack animals. Remove obstacles within reach of the extended arms of a man standing in the center of the trail. Overhead clearing to a height of 10 feet above the ground is sufficient. Only brush and small trees should be cut and these should be cut as close to the ground as can be done without increasing the cost. The object of the trail is to make certain of a passable route in the time of need. The amount of work done should be gaged accordingly.
Grading of way trails is not necessary except to provide footing for pack animals. All grading work should be cut to a minimum.
Ruling grades of way trails should be 15 percent. Grades over 15 percent to a maximum of 40 percent, within the limitations expressed in table 1, should be used to get the best location at the minimum cost.
TABLE 1.—Permissible grades above 15 percent on ways
| Grade (percent) | Distance ordinarily permissible |
| 16 to 25 | One-half mile. |
| 26 to 35 | One-fourth mile. |
| 36 to 40 | 100 yards. |
Reverse grades up to 40 percent, at reasonable intervals, may be used.
Marking of way trails is of first importance. Way trails should be marked by signs, blazing, or otherwise so that they can be readily found and followed by a fire fighter at night.
20.—STANDARDS FOR SECONDARY AND PRIMARY TRAILS
Do not start work on any trail until the route has been definitely chosen after careful reconnaissance and the main control points established. Never begin construction on any section of a trail until the location of that section has been marked on the ground by stakes or other plain markers.
21.—STAKING
At intervals of 25 to 50 feet where excavating is to be done, mark the grade line with stakes or some other form of durable indicators. Place the indicators on grade, that is, where digging work starts. On flats and along slopes under 30 percent, where a simple mark will take the place of grading, space stakes or indicators only close enough together to make or correct alinement of the trail and uniformity of the grade.
Wherever practicable, foreman or some other experienced man should scratch a narrow line between indicators or stakes. This should insure an evenly sustained grade. Mattock men or pick men should never start work before the grade line has been thus indicated. The foreman should see that graders always use this line as a base. (See fig. 2.)
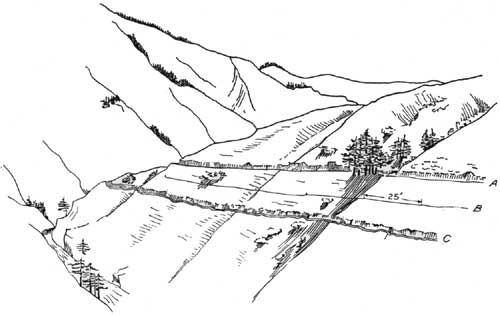
|
| FIGURE 2.—Trails constructed from marked and unmarked grade lines. (click on image for a PDF version) |
22.—GRADES
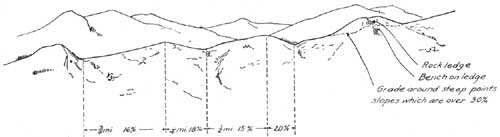
No standard gradients are established. Use the grade up to 15 percent which will result in the least amount of construction, or shortest distance between control points. If the shortest route lies along a gradient in excess of 15 percent for more than one-half mile, cut the grade down to 15 percent by increasing the distance, but do not go below 15 percent.
To avoid expensive construction and to get the best location at a justificable cost in ascending or descending, use of grades over 15 percent to a maximum of 30 percent within the limitation expressed in table 2 is considered to be good practice. To accomplish the same object, it is also good practice to use reverse grades up to 80 percent at reasonable intervals for distances which will not give a loss of elevation of more than 50 feet in one reverse section.
TABLE 2.—Permissible grades above 15 percent on trails
| Grade (percent) | Distance ordinarily permissible |
| 16 to 20 | One-half mile. |
| 21 to 25 | One-fourth mile. |
| 26 to 30 | 100 yards. |
Along creeks of slight fall, or in paralleling the contour of a mountain, make no effort to maintain uniform grades if construction cost can be materially reduced without material decrease in rate of travel. By use of undulating grades to a reasonable extent, avoid bluffs, slides, and exceedingly steep slopes.
Along ridges and points, always use the crest of the ridge if its ups and downs do not exceed an approximate average of 15 percent for distances greater than those shown in table 2, or if the crest is not obstructed by a series of projecting bluffs or rocks.
|
| FIGURE 3.—Showing trail on top of a ridge (click on image for a PDF version) |
23.—CLEARING ON SECONDARY AND PRIMARY TRAILS
Clear to a sufficient width and height to provide unobstructed passage of loaded pack animals and horsemen, even when the brush is loaded with snow. A rough rule of thumb generally applicable, but not always so, is to remove obstacles from either side within reach of the extended arms of a man standing at the approximate center of the tread or point of travel. Overhead clearing 10 feet from trail bed is the general working average required. Cut large trees only where location around them is impracticable. Always keep in mind the point of view of a forester as well as that of a trail builder.
Cut trees and brush as close to the ground as is practicable without unduly increasing the cost.
Do not blast stumps in advance of grading. Stumps at the top of back slopes should seldom be blasted out. Never blast stumps located at the outer edge of the tread. Cut interfering roots but leave the stump to serve as a support to the trail. (See fig. 4.)
In clearing right-of-way always fall timber downhill, where possible, and throw brush downhill if it is not to be burned.
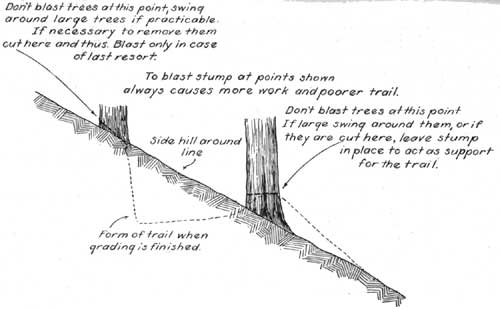
|
| FIGURE 4.—When not to remove stumps. (click on image for a PDF version) |
24.—BRUSH DISPOSAL
Pile and burn brush, limbs, and tops under 4 inches in diameter on projects to be used largely by the general public, if in accordance with the prevailing timber sale practice. Wherever safe, burn at the time of clearing.
On recreational trails, all brush and debris must be disposed of by burning. If clearing has been accomplished during the fire period, the debris should be piled for later destruction.
On projects in more isolated regions to be little used by the public, dispose of the debris by lopping and throwing it downhill, or by roughly piling it beside the trail on level or nearly level locations. However, where the Regional Forester considers it sound practice to dispose of brush completely, pile and burn it. Brush should not be piled and burned merely for the sake of the brush-burning principle.
25.—WIDTH OF TRAIL
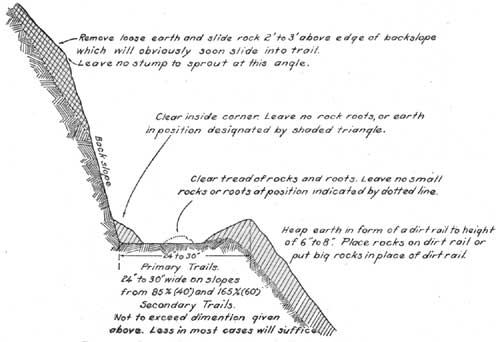
Width of trail means the distance from the inside edge to the outside edge of the trail. (See fig. 5.)
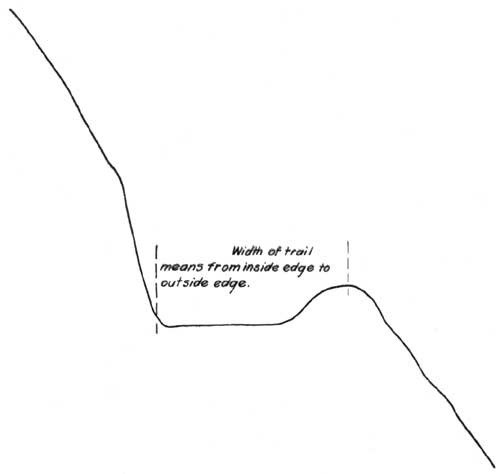
|
| FIGURE 5.—How to measure width of trail. |
Table 2 and figures 6 to 10 indicate specifications and designs applicable to primary trails under varying slopes. Exception may be made only:
(a) Where a ditch is necessary to carry off seepage from springs. (See fig. 17.)
(b) On certain recreation trails where the Regional Forester can justify the construction of wider trails than described in the specifications and diagrams.

|
| FIGURE 6.—Cross section of typical trail on slopes between 30 and 85 percent. (click on image for a PDF version) |
|
| FIGURE 7.—Cross section of typical trail on slopes between 85 and 185 percent. (click on image for a PDF version) |
|
| FIGURE 8.—Trail construction around bluffs. (click on image for a PDF version) |

|
| FIGURE 9.—Type of trail suited to regions of heavy rains. (click on image for a PDF version) |
|
| FIGURE 10.—Inapplicable construction in Southwest. (click on image for a PDF version) |
To warrant any exception, a showing must be made in every case that the exception is justified by some inescapable demand rather than upon a Forest Officer's interpretation or opinion of what the recreationists want or need in the way of trails. Under normal conditions and circumstances, trails built upon the specifications for primary trails are adequate for all purposes including recreational use. Forest Officers should educate the public in good trail economics and will never encourage extravagant ideas in trail construction.
It is recognized that completed secondary trails on steep slopes and rough ground may approach the standards of width and finish of primary trails, but should seldom equal and never exceed them. Always confine work on secondary trails to that which is just necessary to furnish reasonably easy and safe passage and no more. Do not grade treads on ways except where impossible for loaded animals to pass. Confine work to clearing logs and brush and unescapable groups or reproduction.
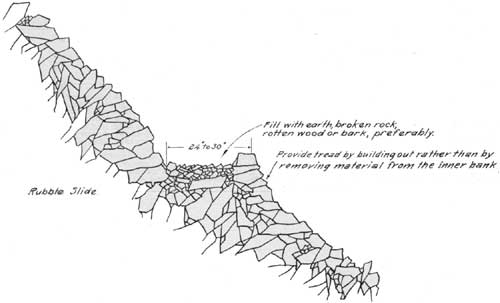
26.—ROCK SLIDES
In building either class of trail across rubble slides remove only sufficient material to provide good footing for an animal. Do not attempt to make a nice-looking job. To do so may mean the making of a deep cut which, if the rock is small, seriously disturbs the equilibrium of the material. This disturbance frequently leads to never-ending obstruction and continuous maintenance (figs. 11—12).
|
| FIGURE 11.—Trail on rubble consisting of small rocks. (click on image for a PDF version) |
|
| FIGURE 12.—Trail on rubble consisting of large rocks. (click on image for a PDF version) |
27.—TURNOUTS
Along very steep slopes, under certain circumstances of use, it may be necessary to improve natural turnouts at intervals. Such places are most commonly found on points, or in gullies or ravines.
Short, rough treads above or below the regular one may be made to provide passing places for pack trains or other forms of heavy travel on long stretches of abrupt slopes lacking in natural turnouts. Confine work on passing trails to the minimum; merely make a passing place safe.
TABLE 3.—Width of Ways and Trails
| Class of trail | Side slopes |
Width over all (inches) |
Notes | |
| Percentage | Corresponding degree of slope | |||
| Ways | Do not grade where loaded pack animals can get footing. Where grading is actually necessary, make treads only wide enough to give footing. Twelve to fifteen inches is enough. | |||
| Secondary | 0 to 50 | 0 to 26 | None | Simply mark a narrow line to indicate the proposed line of travel. If stumps, rocks, and roots occur, remove them only to a width sufficient to provide free passage and never in excess of 24 inches. |
| Primary | 0 to 30 | 0 to 18 | None | |
| Secondary | 50 to 85 | 27 to 40 | 24 maximum | Any width to a maximum of 24 inches, which will make passage reasonably easy and safe. |
| Primary | 31 to 85 | 18 to 40 | 24 maximum | |
| Secondary | 85 to 165 | 40 to 60 | 30 maximum | Any width up to a maximum of 30 inches which will make passage reasonably easy and safe. |
| Primary | 85 to 165 | 40 to 60 | 24 to 30 maximum | |
| Secondary | Over 165 | Over 60 | 36 maximum | Any width up to a maximum of 36 inches which will make passage reasonably easy and safe. |
| Primary | 85 to 165 | 40 to 60 | 24 to 30 maximum | |
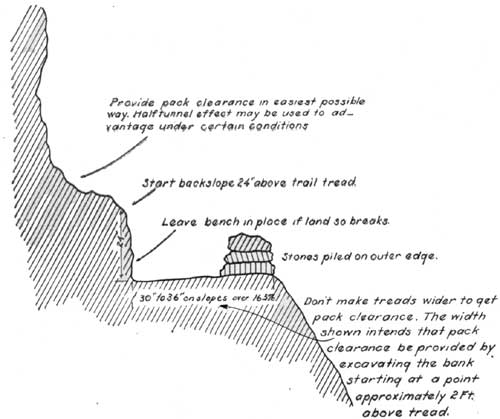
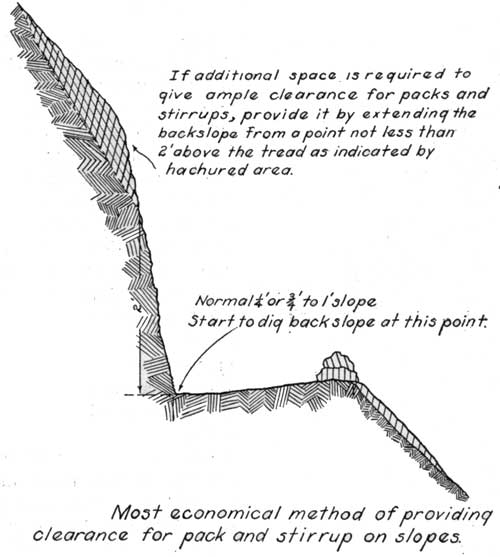
26.—BACK SLOPES
In earth, start back slopes from inside edge of tread. Give sufficient pitch to the back slopes to bring the earth to angle of repose. If packs or stirrups will not then clear, provide ample room by removing more earth from the bank at the position designated in figure 13. These instructions apply to both primary and secondary trails.
|
| FIGURE 13.—Economical method of clearing for pack and stirrup. |
In solid rock, start back slope 2 feet above trail tread. Additional clear space for packs or stirrups should be provided in the easiest possible way. (See fig. 8.)
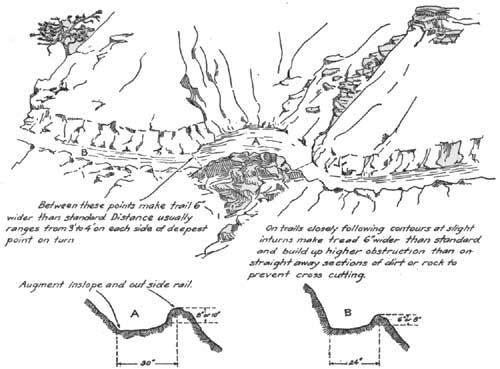
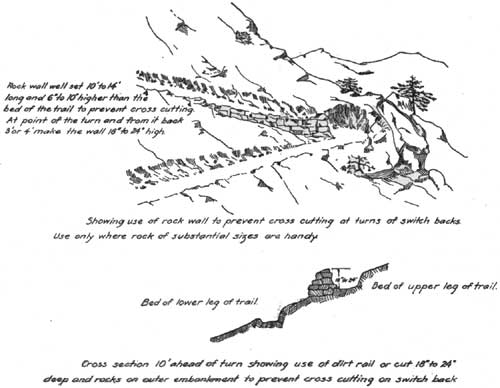
29.—SWITCHBACKS
Switchbacks are undesirable and involve the moving of large quantities of material. They are often necessary on primary and secondary trails where the physical characteristics limit the location rather definitely, and where the difference in elevation between two points is such that the maximum allowable grade is not sufficient to meet the required rise in the distance obtainable.
Some method of preventing crosscutting should be used on primary trails unless the turn is made in solid rock, or around a large tree. Two methods are shown in figures 14 and 15.

|
| FIGURE 14.—Desirable width of turn and guard rail. (click on image for a PDF version) |
|
| FIGURE 15.—Rock wall to prevent crosscutting on turns. (click on image for a PDF version) |
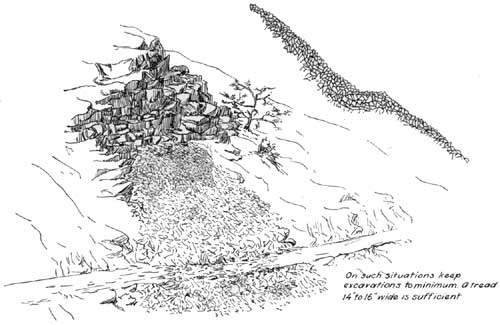
30.—ROCK WALLS
Rock walls should be used only where it is cheaper to construct a wall than to blast out a new trail tread. (See fig. 16.)

|
| FIGURE 16.—Building a rock wall. (click on image for a PDF version) |
In wall construction, a foundation is first prepared on solid earth or rock. The minimum width of the foundation should be 2 feet, and the outer edge should then be 6 inches higher than the inside edge.
Use only sound, durable, and well-shaped rocks. Ordinarily, use no stone less than 3 inches thick nor less than three-quarters of a cubic foot in volume in the body of the wall. Use of smaller stones for chinking is permissible.
Be sure that;
(a) At least one-fourth of the front and rear face of the wall is composed of headers having a length of at least two and a half times the thickness.
(b) All projecting points are removed from top and bottom of main rocks, and that each is laid with good bearing on its broadest face.
(c) All headers are laid with their greatest dimension extending into the wall and never parallel to it, except at corners, in which case alternating headers should cross.
(d) The outer face of the wall has a batter or a slope inward of at least 3 inches to each foot of height.
(e) The wall has a front and rear face well tied together with good big header stones. Avoid, without exception, the practice of laying up a face course of any kind of rock and filling behind it with small rocks and dirt as the wall goes up. It will surely collapse sooner or later.
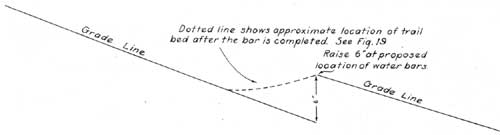
31.—DRAINAGE
Drainage structures will take three forms:
(a) Open ditches (fig. 17) for seepage.
(b) Water bars (figs. 18 and 19) to turn seepage and run-off of rains and snow from the trail.
(c) Culverts.

|
| FIGURE 17.—Trail provided with drainage ditch. (click on image for a PDF version) |
|
| FIGURE 18.—Profile of grade line at water bars. (click on image for a PDF version) |
|
| FIGURE 19.—Section of trail showing water-break log. (click on image for a PDF version) |
32.—OPEN DITCHES
Open ditches should be used to drain seepage or run-off from springs located above a trail. If the earth is solid, open ditches may be used to carry the water across the trail, but the use of water bars or culverts is considered better practice. Never use open ditches to drain the run-off from storms or melting snow. If the ground is soft, the ditch should be protected as shown in figure 17.
33.—WATER BARS
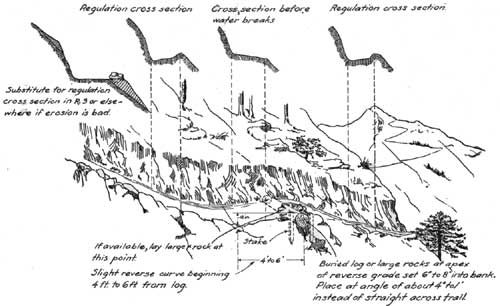
Install water bars at the time the grading work is done. The character of the soil and the volume of the run-off will determine the interval between water bars. This general statement must not be interpreted to mean that water bars may be entirely omitted. They must be placed at intervals of not more than 500 feet on long grades where other provision for cross drainage is not made. They should be installed at an angle of 30° to 45° to a straight line across the trail.
In selecting places for water bars and other forms of drainage, advantage must be taken of natural obstructions. Trees, stumps, roots, and rock aid materially in preventing erosion of the outer embankment. It is sometimes good practice to riprap the lower side of the trail when the soil is loose and natural obstructions are not available. Figures 18 and 19 illustrate the construction of water bars.
34.—CULVERTS
Culverts should be constructed when necessary. It is sometimes necessary to construct culverts to cross streams where soft bottoms and boggy land on each side make travel difficult. Culverts are sometimes constructed to drain seepage water across trails when the earth in the trail is soft and subject to erosion. Culverts should be constructed of large stones or durable timber.
35.—CORDUROY
Avoid boggy land to the fullest possible extent, even if to escape it the best topographical location of a trail must be sacrificed, the best grades abandoned, and time length of a trail materially increased.
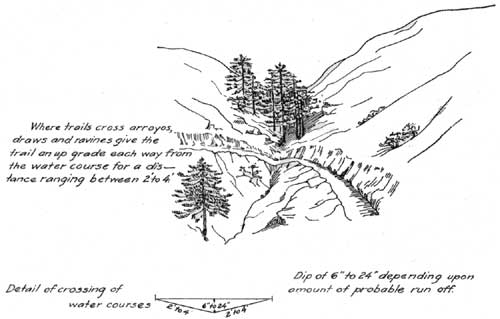
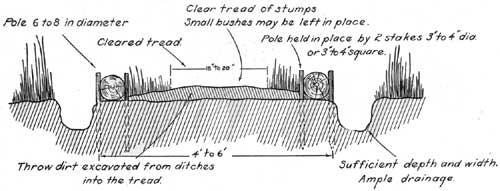
If impracticable to avoid swamps and bogs, first consider the possibility of snaking a dry tread by draining as illustrated in figure 21. If that is not feasible, lay corduroy across such places.
|
| FIGURE 20.—Trails across arroyos, draws, and ravines. (click on image for a PDF version) |
|
| FIGURE 21.—Trail on flat soft wet ground. (click on image for a PDF version) |
|
| FIGURE 22.—Section of split corduroy. (click on image for a PDF version) |

|
| FIGURE 23.—Views of ordinary sill and stringer curduroy. (click on image for a PDF version) |
Do not try to fill boggy places with large rocks. It is bad practice, and the result is simply a place in which a horse may injure or break his leg.
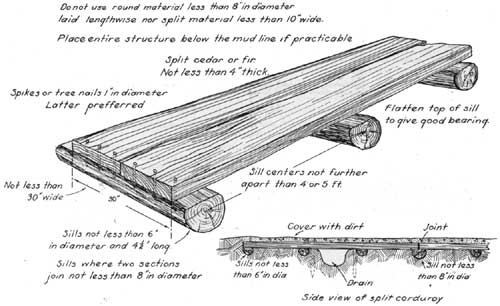
Principles to be observed in all corduroy constructions are:
(a) Extend the ends to solid ground.
(b) Use the most durable timber available of substantial size.
(c) Remove the bark from the logs.
(d) Wherever practicable, place the entire structure—sills, stringers, and flooring—below the mud line instead of placing it on sills which elevate the structure above the line of permanent moisture. This practice will help to prevent rot.
(e) Provide an adequate base of stringers and add sills to prevent sagging and tipping of any section of the structure.
(f) Fasten the flooring in place.
(g) Lay flooring crosswise. This prevents stock from slipping, especially where corduroy is necessary on a grade.
36.—FORDS
Fords, in place of bridges, are to be favored where suitable ones can be located. The ideal ford is at a point where the stream widens out, with a slackening in velocity and a gravelly bottom. Carry grading to the water's edge so an animal will not drop off on one side and have to scramble out on the other. Wherever practicable, rocky fords should, during low water, be improved by rolling out or blasting rocks from the tread and filling in with smaller rocks and gravel, or by rolling the loosened rock to the downstream side to restrain debris in the form of sand and small rocks which in time will accumulate and make a good bottom. A log firmly fixed across smaller streams may sometimes be effectively used to form a barrier to hold debris.
| <<< Previous | <<< Contents>>> | Next >>> |
|
forest-trail-handbook/sec6.htm Last Updated: 04-Jan-2010 |